Windows 7 Reviews

Monday, August 9, 2010
windows 7 in depth reviewAfter the successful launch of Windows 7 on 22nd Oct'2009 a continuous review work is going on to show the mutual induction. The significant area where we can do the study are Appearnace, performance, Version restriction and so on.

Windows 7 review of appearance
As most user are firstly attracted by mere look, so I am too. If we discuss on the ground of Appearance then we can't left behind and miss the Aero feature which has created a buzz in the IT industry. The Windows 7 with its Aero Glass theme make the windows translucent and textured boarders. This provides very sloppy look to Windows 7. The variation in choosing color is quite good. It has been an inbuilt feature under Control panel. Windows 7 has new style of applet that loads up within the Control Panel window rather than in a pop-up dialog box. Enhancements to the Aero User Interface (UI) helps you organize your open windows and other desktop components for easier and faster access. The Aero feature has triple function as:

* Aero Peek - hovering over a taskbar icon shows thumbnail of that program. Hovering over the thumbnail shows a preview of that program in full view. Aero Peek also refers to the "Show desktop" button to the far right of the new taskbar.
* Aero Shake -You may have opened several Windows but at a time you need single to work. You can use this feature to minimize all other windows by just dragging the single window back and forth. Shaking it again brings other windows back.
* Aero Snap - Clicking and dragging a window to the right or left side of the desktop causes the window to fill the respective half of the screen. Snapping a window to the top of the desktop maximizes it. Resizing a window to touch the top or bottom edge of the screen maximizes the window to full height, whilst retaining its width; these windows will then slide horizontally if moved by the title bar, or can be pulled off, which returns the window to its original height.

Windows 7 review of installation process
Installation is the first stage from where the testing begins. Though not of vital importance to consider on that basis because we are don't need this procedure again and again. But still a initial requirement.

The process show a cutting edge experinence over the earlier version. Even more contributive point is that new installer can load drivers from sources other than floppy disks. CDs, USB keys, and hard drives can all be used as a source of drivers. Windows 7 can be installed from USB key or hard disk, which makes for much faster installs, not to mention much less frustration when trying to customize the process.

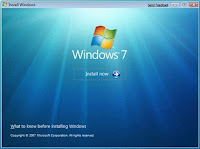
Windows 7 installer has cut down the number of questions being asked during installation making your work easier. Though for some it may seems to be non-interactive. Installing Windows 7 is a child play. You just need to insert the DVDs into the DVD drive and sit idle. When the setup emerges it will ask your country and language. Select from the drop down menu. Now the installation Wizard will start. The install now options will leads to the advanced install options. For repairing a corrupt installation the 'Repair your computer' button located at the bottom-left can be used. For fresh installs just click the Install now button. Go on following the screen prompts. Accep the license agreement after reading it.

Windows 7 review of Performance
A wide range of Test has been performed to check the performance of Windows 7. Let's talk about WorldBench 6 mark Test. Here the comparative analysis was performed on 6 crieteria which are CPU properties, 2D graphics analysis and GUI feature, 3D graphics test to judge simple to complex DirectX 3D graphics and animations, Disk tests Reading, writing and seeking within disk files and CD / DVD test Test.

The result showed Windows 7 on the top. Though there was a marginal difference.Windows 7 Ultimate 64-bit earned a WorldBench 6 mark of 144, edging out Windows Vista Ultimate 64-bit, which scored 139. Here Windows 7 was roughly 3.6 percent faster than Windows Vista. The test was performed on a system with configuration 2.66GHz Intel Core i7 processor.

Measuring the same parameter on HP Pavilion a6710t desktop (with a 2.6GHz Pentium Dual Core E5300 CPU), with both the 32-bit and 64-bit editions of Windows Vista Ultimate and Windows 7 Ultimate also reveals the same story. Running the 32-bit versions of Vista and Windows 7, the a6710t saw its WorldBench 6 score increase only a little, from 104 on the former to 106 on the latter.

Similar incremental performance improvements on portable test PCs as well. With the 32-bit versions of Vista Home Premium and Windows 7 Home Premium, our Gateway T-6815 notebook went from a WorldBench 6 score of 58 on the older OS to a result of 64 on the newer one. Our Lenovo IdeaPad Y530 laptop's WorldBench 6 score improved by only one point with Windows 7 in our comparison of 32-bit Ultimate editions (going from 83 to 84); when we tested the 64-bit editions of the two OSs, we again saw a modest boost, with the Y530's score increasing from 79 to 83.

Windows 7 review of versions
Windows 7 brings a version for every PC. Hence resolving the dilemma in chosing for the correct version along with good offers to allure the consumer of all range.

From biginner to proficient these are: Starter, Home Basic, Home Premium, Professional, Enterprise, and Ultimate. Though on real practice only three version are significant. Starter Edition is worthless; it's crippled (it omits most of the user-visible features that make Vista and Windows 7 worthwhile). Its only purpose is to allow Microsoft to have a dirt-cheap OS to offer to netbook makers as an alternative to Linux. Home Basic is restricted to emerging markets; though less limited than Starter edition, it too lacks most of the features that make Windows 7 attractive to consumers. Enterprise and Ultimate are the same on anatomical ground they differ a little bit in licensing context. Enterprise is for volume license customers, while Ultimate is available through retail and OEM channels.

How to Remove AV Security Suite from your Computer?

Monday, July 19, 2010
If you are experiencing a perceptible dip in the performance of your PC, and your Internet connection has suddenly become spotty, you may have malware on your PC. Have you recently installed AV Security Suite? If so, then you definitely have one virus, as this supposed antimalware software is actually a virus in disguise. Because it is a virus, is does do real harm, and because it's a virus, it can be quite difficult to remove AV Security Suite. While the option to uninstall AV Security Suite will actually appear in the change/remove programs portion of your control panel, it won't do you any good.

What is so scary about this type of virus is that there are so many of them out there. In this case AV Security Suite removal has proven particularly difficult. It writes itself into several directories of your computer and spreads fast. The virus' main purpose is to steal your private information so that it can be sold. It slows down your PC and your internet connection in the process.

An ounce of prevention is worth a pound of cure, really does apply in this case. If you don't want to have to delete AV Security Suite, then don't get infected by it. To prevent infection you should avoid these things:

* Browsing new and obscure websites- Many websites are set up specifically to hijack your browser.
* Opening email with strange, generic subjects - these are often from people you actually know, if the message is not explicitly personal, you may want to ask your contact about it through other means before opening it.
* Avoid using P2P software- The files you download using such software come from a "swarm" this means that your PC is open to several users who may not all have virus protection.

If you have been infected, there are two ways to remove AV Security Suite; you can do it manually, by deleting all the files the virus has copied onto your system. There will be virus associated files with.exe,.bat,.dll, and.lnk extensions. You need to delete all of the ones related to the virus, but you mustn't delete any other file of this type or you could render your PC unbootable. Next you need to do a registry hack, you need to seek traces of the virus out in the folders HKEY_LOCAL_MACHINE and HKEY_CURRENT_USER. Again though, care must be taken not to delete anything but the virus related files.

Not too many people opt for manual removal as it is complicated and risky. The safer, easier and more effective method to get rid of AV Security Suite is with a reputable virus remover. This will not only thoroughly scan your computer and eliminate the virus, it will also provide sustained protection.

Tired of viruses infecting your computer? Want to surf the web with the peace of mind that your computer is safe and secure? Get your free scan from the top virus protection and remove AV Security Suite.

How To Remove The Google Redirect Virus?

Friday, July 16, 2010
Google redirect virus is most recent virus on Internet and it affects browsers mostly. It is made to maneuver Google search results. Virus installs via Trojan and while searching on Google, It conceals Google results and displays advertisements or associate links associated to that topic. Google redirect virus even displays fake advertisements, pop-ups; transmit spam pages and much more. It doesn’t allow searching on Google and it is a indication that to protect PC in future by via a Spyware Remover.

• To delete Google Redirect Virus, first know what this threat is and how it harms PC? The malware lives up to its name and carets redirection of search results. While searching onGoogle, virus redirects to other wrong websites and advertisements. It allows seeing expected results from Google. And also, this virus do the following:

1) It displays errors prompting filename.exe is invalid WIn32 application.

2) If downloading and attempting to install a new application, it might prompt that setup files are corrupted. It keeps on bugging over and over.

3) It infects Web browsers and then redirect to malicious websites containing advertisements and pop ups.

• It is very crucial to delete Google Redirect Virus as soon as possible To delete Google Redirect Virus, follow blow given steps:

Go to Start menu open Run. Enter "devmgmt.msc" and Press OK button. Device Manager will come up. In Device Manager, select "View and click on Show Hidden Devices".

• Press "Plus" symbol. Then disable "TDSSserv.sys". Ensure not to click on Un-Install option otherwise infection will be back after restarting PC.

Source: techfuels.com

Optimize Windows 7 Computer For Peak Performance

Thursday, June 24, 2010

Our personal computers are like fine automobiles—they need preventive maintenance to run efficiently and to avoid major breakdowns.

The following tips can help improve your computer's performance for all versions of Windows 7 operating system:-

Clean up disk errors

Run once a week

Whenever a program crashes or you experience some power outage, your computer may create errors on its hard disk. Over time, the errors can slow your computer. Luckily, the Windows operating system includes a Disk Check program to check and clean any errors on your computer and to help keep it running smoothly.

To run Disk Check in Windows 7 OS:

  1. Click the Start button Start icon, and then click Computer.

  2. Right-click the hard disk drive that you want to check, and then click Properties.

  3. Click the Tools tab, and then, under Error-checking, click Check now.

    To automatically repair problems with files and folders that the scan detects, select Automatically fix file system errors. Otherwise, the disk check will simply report problems but not fix them.

    To perform a thorough disk check, select Scan for and attempt recovery of bad sectors. This scan attempts to find and repair physical errors on the hard disk itself, and it can take much longer to complete.

    To check for both file errors and physical errors, select both Automatically fix file system errors and Scan for and attempt recovery of bad sectors.

  4. Click Start.

Depending upon the size of your hard disk, this may take several minutes. For best results, don't use your computer for any other tasks while it's checking for errors.

Note: If you select Automatically fix file system errors for a disk that is in use, you'll be prompted to reschedule the disk check for the next time you restart your computer.

To run Disk Cleanup Windows 7:

  1. In the Start menu, click All Programs, click Accessories, click System Tools, and then click Disk Cleanup. Disk Cleanup will automatically begin to scan your disk for files you can delete.

    Note: If the Disk Cleanup: Drive Selection dialog box appears, select the hard disk drive that you want to clean up, and then click OK.

  2. Click the Disk Cleanup tab, and then select the check boxes for the files you want to delete.

  3. When you finish selecting the files you want to delete, click OK, and then, to confirm the operation, click Delete files. Disk Cleanup then removes all unnecessary files from your computer.

The More Options tab is available when you choose to clean files from all users on the computer.

Rearrange your data

Run once a month

Don't be shocked, but your computer can get sloppy. It often breaks files side by side to increase the speed of access and retrieval. However, as files are updated, your computer saves these updates on the largest space available on the hard drive, often found far away from the other adjacent sectors of the file.

The result: a fragmented file. Fragmented files cause slower performance. This is because your computer must now search for all of the file's parts. In other words, your computer knows where all the pieces are, but putting them back together in the correct order—when you need them—can slow your computer down.

Windows includes a Disk Defragmenter program to piece all your files back together again (if only Humpty Dumpty had been so lucky) and make them available to open more quickly.

To run the Disk Defragmenter:

  1. In the Start menu, click My Computer.

  2. In the My Computer dialog box, right-click the drive you wish to check for errors (for most of us this is the C: drive, unless you have multiple drives on your computer), and then click Properties.

  3. In the Properties dialog box, click the Tools tab, and then in the Defragmentation section, click Defragment Now…

  4. In the Disk Defragmenter dialog box, select the Volume (most likely your Local Disk C:) at the top of the screen, and then click Analyze (disk).

  5. After analyzing your computer, the Disk Defragmenter displays a message stating whether you should defragment your computer. Press Defragment (disk) to clean up your computer if necessary. The Disk Defragmenter will reorganize files by placing them together and sorting them by program and size, as shown here.

Optimize Windows 7 Computer For Peak erformance

How To Disable Useless Services To Optimize Your PC ?

Monday, June 14, 2010
Right-click My Computer and select Properties


Switch to Advanced tab, and click the first (under Performance subsection) Settings button.
Performance Options window will open.
Select Adjust For Best Performance option, and click OK button.


Click Error Reporting button on the bottom, and turn off error reporting: uncheck Windows operating system and Programs boxes, and switching to Disable error reporting option. Click OK button.


Now switch to Remote tab, and click Advanced button under Remote Assistance subsection.


Uncheck Allow this computer to be controlled remotely, and click OK button. Uncheck Allow Remote Assistance invitations to be sent from this computer. Uncheck Allow users to be connected remotely to this computer.

Switch to Automatic Updates tab, and check Keep my computer up to date option (Pic.13).

Click OK button. Restart computer.


Note 3: Set it to update at a time your computer will be turned on. This will ensure that your computer will always be up-to-date with the latest worm/security patches.


Right-click My Computer and select Manage.

Computer Management window will open .

Maximize Computer Management window

Click plus sign next to Services and Applications, click Services, and switch to Standard tab on the right .


Change Startup Type for Alerter service by double-clicking Alerter, selecting Disabled from Startup type dropdown box, and clicking OK button.


Now disable the following services using the same technique:

Automatic Updates

Background Intelligent Transfer Service

ClipBook

Computer Browser (if you have a standalone pc – no network)

Error Reporting Service

Fast User Switching Compatibility

Help and Support (switch to Manual)

Indexing Service

Messenger

NetMeeting Remote Desktop Sharing

Performance Logs and Alerts

QoS RSVP

Remote Desktop Help Session Manager

Remote Registry

Server (if you have a standalone pc – no network)

Telnet

Themes

Upload Manager

WebClient

Wireless Zero Configuration (don’t disable if using wireless network/Internet connection)

Close Computer Management window.

Restart computer.

Browser Comparison

Thursday, June 10, 2010
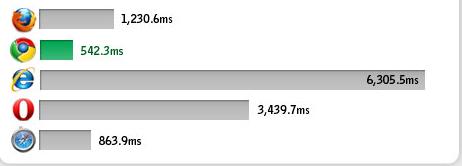
Browser Cache Performance
Total page load times for Yahoo.com with primed caches were measured to see how well browser perform when you have visited a website already. The same variable latency difference may be relevant here with calculating load time.


CPU Usage (Under Stress)
CPU usage reveals how much resources a browser needs: resource hobs show higher CPU utilization. Windows Resource Monitor was used to obtain average CPU occupation (%) while SunSpider was running to simulate activity.


CSS Rendering Speed
Browser with fast CSS rendering speed have faster page response time. The nontroppo.org CSS Rendering Benchmark was used to measure the onLoad duration for complete table-to-div conversion.


DOM Selection Speed
The faster a browser can select elements in a web page, the more responsive it is on asynchronous page updates (which most Web 2.0 apps hevily rely on). SlickSpeed was used to see how fast jQuery selects elements.


JavaScript Speed:-
Fast JavaScript execution times means that Ajax-heavy sites like Digg and webapps like Gmail will be more responsive to user action. To test JavaScript function execution speeds, SunSpider JavaScript Benchmark was used.


Page Load Time
The total time it takes to load Yahoo.com's front page was measured using Numion Stopwatch. Note that due to latency difference that occur with variable site traffic and server load, caution should be used when interpreting the results.


Overall Performance
Based on the result, the relative rating of each web browser is displayed below.


Additional Info


source:-